2.2 创建表单
Drupal 8 表单
现在我们已经能够创建从区块布局画面可重复使用的区块,是时候学习怎样利用 API 添加一个配置表单了。 这个新的配置表单允许你使用用户界面设置显示在区块内的一个文本字符串。
以下面的方式处理额外的配置表单元素:
- 使用
blockForm()方法向接收的 $form 数组添加元素。 - 使用
blockSubmit()方法保存从表单接收的数据。 - 使用
defaultConfiguration()方法定义默认的配置值。
为表单创建个区块
首先,我们创建一个包含这个表单的区块:
- 创建文件
block_example/src/Plugin/Block/ExampleConfigurableTextBlock.php - 粘贴以下代码,见辅助内容区
- 清空缓存,查看区块。
<?php

/**
 * @file
 * Contains \Drupal\block_example\Plugin\Block\ExampleConfigurableTextBlock.
 */

namespace Drupal\block_example\Plugin\Block;

use Drupal\Core\Block\Annotation\Block;
use Drupal\Core\Block\BlockBase;
use Drupal\Core\Annotation\Translation;
use Drupal\Core\Form\FormStateInterface;

/**
 * Provides a 'Example: configurable text string' block.
 *
 * Drupal\block\BlockBase gives us a very useful set of basic functionality for
 * this configurable block. We can just fill in a few of the blanks with
 * defaultConfiguration(), blockForm(), blockSubmit(), and build().
 *
 * @Block(
 *   id = "example_configurable_text",
 *   admin_label = @Translation("Title of first block (example_configurable_text)"),
 *   category = @Translation("Example")
 * )
 */
class ExampleConfigurableTextBlock extends BlockBase {

  /**
   * {@inheritdoc}
   */
  public function defaultConfiguration() {
    return [
      'block_example_string' => $this->t('A default value. This block was created at %time', ['%time' => date('c')]),
    ];
  }

  /**
   * {@inheritdoc}
   */
  public function blockForm($form, FormStateInterface $form_state) {
    $form['block_example_string_text'] = [
      '#type' => 'textfield',
      '#title' => $this->t('Block contents'),
      '#size' => 60,
      '#description' => $this->t('This text will appear in the example block.'),
      '#default_value' => $this->configuration['block_example_string'],
    ];
    return $form;
  }

  /**
   * {@inheritdoc}
   */
  public function blockSubmit($form, FormStateInterface $form_state) {
    $this->configuration['block_example_string']
      = $form_state->getValue('block_example_string_text');
  }

  /**
   * {@inheritdoc}
   */
  public function build() {
    return [
      '#type' => 'markup',
      '#markup' => $this->configuration['block_example_string'],
    ];
  }

}
理解新特征和函数
- 避免全局函数
Drupal 8 内每片代码都尽可能的自包含。意味着大多数函数不再暴露在全局范围内而是被封装在类里。
因此不推荐像 Drupal 7 那样直接使用 l() 或 t() 这样的函数。
现在通过叫依赖注入(dependency injection)的系统向类提供功能,这个在后面的课程会讨论。 - 扩展基类
大多数组件(例如区块、控制器)都会使用扩展基类这种模式。
基类封装了很多像 t() 这样的通用机能,所以尽可能的去继承基类。我们创建块的时候继承了BlockBase这个基类,它就定义了类似 Drupal 7 的 t() 方法。 - Traits
Traits 本质上就是我们 Drupal 7 使用的 include,它提供能够被包含在任何类中的额外方法。
通过在 BlockBase 中包含StringTranslationTrait,我们可以使用它的任何方法,就如同这些方法在BlockBase中一样。
$this->t()定义在StringTranslationTrait内。BlockBase继承了ContextAwarePluginBase,ContextAwarePluginBase使用了StringTranslationTrait。所以$this->t()被引入到了 BlockBase 内。
创建表单
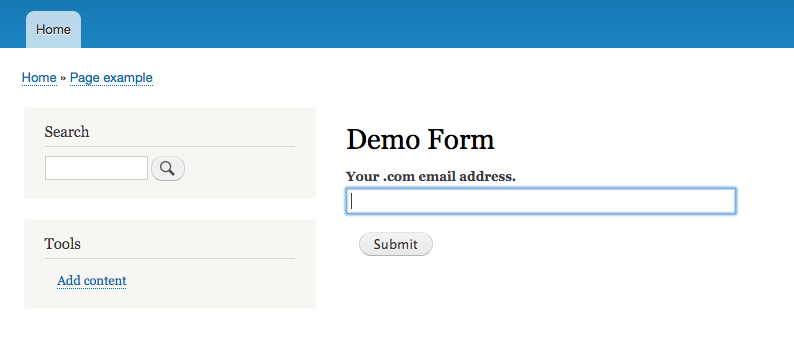
现在创建个简单的表单。不幸的是 Examples 没有包含表单的例子,我们利用它里面的 page_example 模块创建下。
创建的表单包含一个 email 字段,这是 Drupal 8 新增加的表单元素。
默认 Drupal 8 会校验输入的值是否是 email 地址,代码也使用了校验函数确保输入的 email 是 .com 的。
输入错误会设置个表单错误,正确会输出一句提示信息。代码见辅助内容区。
这段代码和 Drupal 7 创建表单很相似,只是使用了面向对象的方式。这是因为 Drupal 8 的表单 API 除了增加新元素和作了类封装以外基本没动。
PageExampleForm 中的代码由下面几件事组成:
- 为 PageExampleForm 类设置了名字空间,继承了核心 FormBase 类。
- 实现了 4 个方法,3 个和 Drupal 7 类似。
getFormId()是一个新的、必须定义的方法,只是返回表单机器名。buildForm()也是必须定义的,它返回一个渲染数组,类似 Drupal 7 的 hook_form 。validateForm()是可选的,进行校验,类似 Drupal 7 的hook_form_validate。submitForm()执行提交处理,类似 Drupal 7 的hook_form_submit。
<?php

/**
 * @file
 * Contains \Drupal\page_example\Form\PageExampleForm.
 */

namespace Drupal\page_example\Form;

use Drupal\Core\Form\FormBase;
use Drupal\Core\Form\FormStateInterface;

class PageExampleForm extends FormBase {

  /**
   * {@inheritdoc}.
   */
  public function getFormId() {
    return 'page_example_form';
  }

  /**
   * {@inheritdoc}.
   */
  public function buildForm(array $form, FormStateInterface $form_state) {
    $form['email'] = [
      '#type' => 'email',
      '#title' => $this->t('Your .com email address.')
    ];
    $form['show'] = [
      '#type' => 'submit',
      '#value' => $this->t('Submit'),
    ];
    return $form;
  }

  /**
   * {@inheritdoc}
   */
  public function validateForm(array &$form, FormStateInterface $form_state) {
    if (strpos($form_state->getValue('email'), '.com') === FALSE) {
      $form_state->setErrorByName('email', $this->t('This is not a .com email address.'));
    }
  }

  /**
   * {@inheritdoc}
   */
  public function submitForm(array &$form, FormStateInterface $form_state) {
    drupal_set_message($this->t('Your email address is @email', ['@email' => $form_state->getValue('email')]));
  }
}
定义路由
为了使用表单,路由是必须定义的,我们追加到之前的 page_example.routing.yml 文件内。代码见辅助内容区。
在 defaults 下使用 _form 替换 _controller,指定目标是一个 Form 类。
page_example_form:
  path: '/examples/page_example/form'
  defaults:
    _form: '\Drupal\page_example\Form\PageExampleForm'
    _title: 'Demo Form'
  requirements:
    _permission: 'access simple page'
清空缓存,访问 http://mysite.com/examples/page_example/form ,你会看到这个表单。
如果你熟悉 drupal_get_form(),可能会想怎样像 Drupal 7 那样加载一个表单呢?
Drupal 8 中使用全局类,你会用到 formBuilder() 方法:
$form = \Drupal::formBuilder()->getForm('Drupal\demo\Form\DemoForm');
这个 $form 返回的是可渲染的数组。